
aws 관련 학습량이 점점 늘어남에 따라 학습한 내용을 정리하려함.
개요
풀스택 앱 구축을 위한 개발환경으로 기존 Amplify 백엔드 구축기능을 기반으로 빠르게 UI개발을 만들수 있도록 도와주는 서비스로
현재 개발중인 서비스를 스튜디오로 얼마나 빠르게 구축할수 있는지 테스트시도중
Amplify Studio
Amplify Studio의 UI Library 기능이 최근 AWS re-invent에서 소개되었고. 이 UI Library를 통해 피그마 (Figma)디자인을 리액트 컴포넌트 코드로 변환가능.
AWS Amplify CLI 설치
Amplify CLI를 글로벌 설치.
(글로벌 설치란 패키지 안에서만 사용하는 것이 아닌 컴퓨터 안에 설치해서 언제든 사용가능)
$ npm install -g @aws-amplify/cli
$ amplify -v
8.5.0
Amplify configure
Amplify CLI를 위한 IAM 계정 생성
$ amplify configure

Enter the access key of the newly created user:
? accessKeyId:     # YOUR_ACCESS_KEY_ID
? secretAccessKey: # YOUR_SECRET_ACCESS_KEYThis would update/create the AWS Profile in your local machine
? Profile Name: # (default)Successfully set up the new user.IAM 유저 추가

권한추가
AdministratorAccess 권한을 가진 IAM 유저를 만들면 Amplify CLI가 S3, AppSync, Lambda, cognito 등과 같이 Amplify에서 사용해야 하는 기타 AWS서비스를 사용할 수 있게 됨.

Amplify CLI를 설치하여 데이터 모델 가져오기
기존 React 프로젝트를 열거나 프로젝트가 없는 경우 새 React 프로젝트를 만듬.
$ npx create-react-app amplify-app-react
$ cd amplify-react-app
$ npm install aws-amplify @aws-amplify/ui-react
$ npm start다음으로, 리액트 앱의 루트 디렉토리로 이동한 뒤에 Amplify를 추가
$ amplify init % amplify init
╭────────────────────────────────────────────────────────────╮
│ │
│ Update available: │
│ Run amplify upgrade for the latest features and fixes! │
│ │
╰────────────────────────────────────────────────────────────╯
Note: It is recommended to run this command from the root of your app directory
? Enter a name for the project amplifyappreact
The following configuration will be applied:
Project information
| Name: amplifyappreact
| Environment: dev
| Default editor: Visual Studio Code
| App type: javascript
| Javascript framework: react
| Source Directory Path: src
| Distribution Directory Path: build
| Build Command: npm run-script build
| Start Command: npm run-script start
? Initialize the project with the above configuration? Yes
Using default provider awscloudformation
? Select the authentication method you want to use: AWS profile
For more information on AWS Profiles, see:
https://docs.aws.amazon.com/cli/latest/userguide/cli-configure-profiles.html
? Please choose the profile you want to use default
Adding backend environment dev to AWS Amplify app: d2elf8ye1eopo
⠏ Initializing project in the cloud...
CREATE_IN_PROGRESS amplify-amplifyappreact-dev-172439 AWS::CloudFormation::Stack Mon Jun 20 2022 17:24:40 GMT+0900 (GMT+09:00) User Initiated
CREATE_IN_PROGRESS DeploymentBucket AWS::S3::Bucket Mon Jun 20 2022 17:24:43 GMT+0900 (GMT+09:00)
CREATE_IN_PROGRESS DeploymentBucketBlockHTTP AWS::S3::BucketPolicy Mon Jun 20 2022 17:24:43 GMT+0900 (GMT+09:00)
CREATE_IN_PROGRESS AuthRole AWS::IAM::Role Mon Jun 20 2022 17:24:44 GMT+0900 (GMT+09:00)
CREATE_IN_PROGRESS UnauthRole AWS::IAM::Role Mon Jun 20 2022 17:24:44 GMT+0900 (GMT+09:00)
CREATE_IN_PROGRESS DeploymentBucket AWS::S3::Bucket Mon Jun 20 2022 17:24:45 GMT+0900 (GMT+09:00) Resource creation Initiated
⠹ Initializing project in the cloud...
CREATE_IN_PROGRESS AuthRole AWS::IAM::Role Mon Jun 20 2022 17:24:46 GMT+0900 (GMT+09:00) Resource creation Initiated
CREATE_IN_PROGRESS UnauthRole AWS::IAM::Role Mon Jun 20 2022 17:24:46 GMT+0900 (GMT+09:00) Resource creation Initiated
CREATE_IN_PROGRESS DeploymentBucketBlockHTTP AWS::S3::BucketPolicy Mon Jun 20 2022 17:24:49 GMT+0900 (GMT+09:00) Resource creation Initiated
CREATE_COMPLETE DeploymentBucketBlockHTTP AWS::S3::BucketPolicy Mon Jun 20 2022 17:24:49 GMT+0900 (GMT+09:00)
⠦ Initializing project in the cloud...
CREATE_COMPLETE DeploymentBucket AWS::S3::Bucket Mon Jun 20 2022 17:25:06 GMT+0900 (GMT+09:00)
⠏ Initializing project in the cloud...
CREATE_COMPLETE AuthRole AWS::IAM::Role Mon Jun 20 2022 17:25:19 GMT+0900 (GMT+09:00)
CREATE_COMPLETE UnauthRole AWS::IAM::Role Mon Jun 20 2022 17:25:19 GMT+0900 (GMT+09:00)
⠋ Initializing project in the cloud...
CREATE_COMPLETE amplify-amplifyappreact-dev-172439 AWS::CloudFormation::Stack Mon Jun 20 2022 17:25:23 GMT+0900 (GMT+09:00)
✔ Successfully created initial AWS cloud resources for deployments.
✔ Help improve Amplify CLI by sharing non sensitive configurations on failures (y/N) · no
✔ Initialized provider successfully.
✅ Initialized your environment successfully.
Your project has been successfully initialized and connected to the cloud!
Some next steps:
"amplify status" will show you what you've added already and if it's locally configured or deployed
"amplify add <category>" will allow you to add features like user login or a backend API
"amplify push" will build all your local backend resources and provision it in the cloud
"amplify console" to open the Amplify Console and view your project status
"amplify publish" will build all your local backend and frontend resources (if you have hosting category added) and provision it in the cloud
Pro tip:
Try "amplify add api" to create a backend API and then "amplify push" to deploy everythingAWS 콘솔을 통해 Amplify Studio backend 사용을 미리 세팅했다면, 아래 명령어를 통해 쉽게 Amplify Studio로 이동가능함
$ amplify console
? Which site do you want to open? ...
> Amplify Studio
AWS consoleData Model 생성
Amplify Studio로 이동하여 데이터 모델을 생성

enable amplify studio

Create data model

커머스 사이트를 만들고자 한다면 제품에 대한 간단한 데이터 모델이 필요로 함
해당 데이터 구조는 제품명, 설명, 이미지, 그리고 가격으로 이루어져있을 것
이 외에도 원한다면 데이터 구조는 원하는 만큼 많은 내용을 가질 수 있음
추가적으로, 해당 데이터 모델에 접근할 수 있는 유저를 설정해줘야 하는데, Amplify를 통해 세부적인 데이터 권한 설정을 진행할 수 있음. API키를 가진 유저에게만 CRUD 액션을 진행하도록 할 수도 있는데, Amplify는 AWS Cognito를 이용하여 데이터접근, 회원가입, 로그인, 비밀번호관리, O-auth 등의 유저관리가 가능함
위의 사진처럼, 팔고자 하는 아이템의 데이터 모델을 만들고 해당 데이터 모델에 접근할 수 있는 유저를 지정.
화면 오른쪽 상단의 ‘Save and Deploy’ 버튼을 눌러 배포를 완료하면 Amplify가 필요한 클라우드 인프라를 알아서 설정됨
Save and Deploy 를 누른뒤 배포과정을 기다림

deploy완료
데이터 처리를 위해서 Amplify 는 Amazon DynamoDB를 이용하고, 유저 관련 처리를 위해서는 Amazon Cognito를 사용함.
데이터에 접근하기 위해서는 REST API (Amazon API Gateway) 혹은 GraphQl-based API (AWS AppSync)를 사용할 수 있음.
더미 데이터 추가

Content Table에 임의로 데이터 추가.
Figma 디자인을 Amplify UI Library에 Import하기
Amplify Figma template URL: https://www.figma.com/community/file/1047600760128127424
AWS Amplify UI Kit | Figma Community
Figma Community file -
www.figma.com

UI라이브러리에서 피그마 디자인 복사
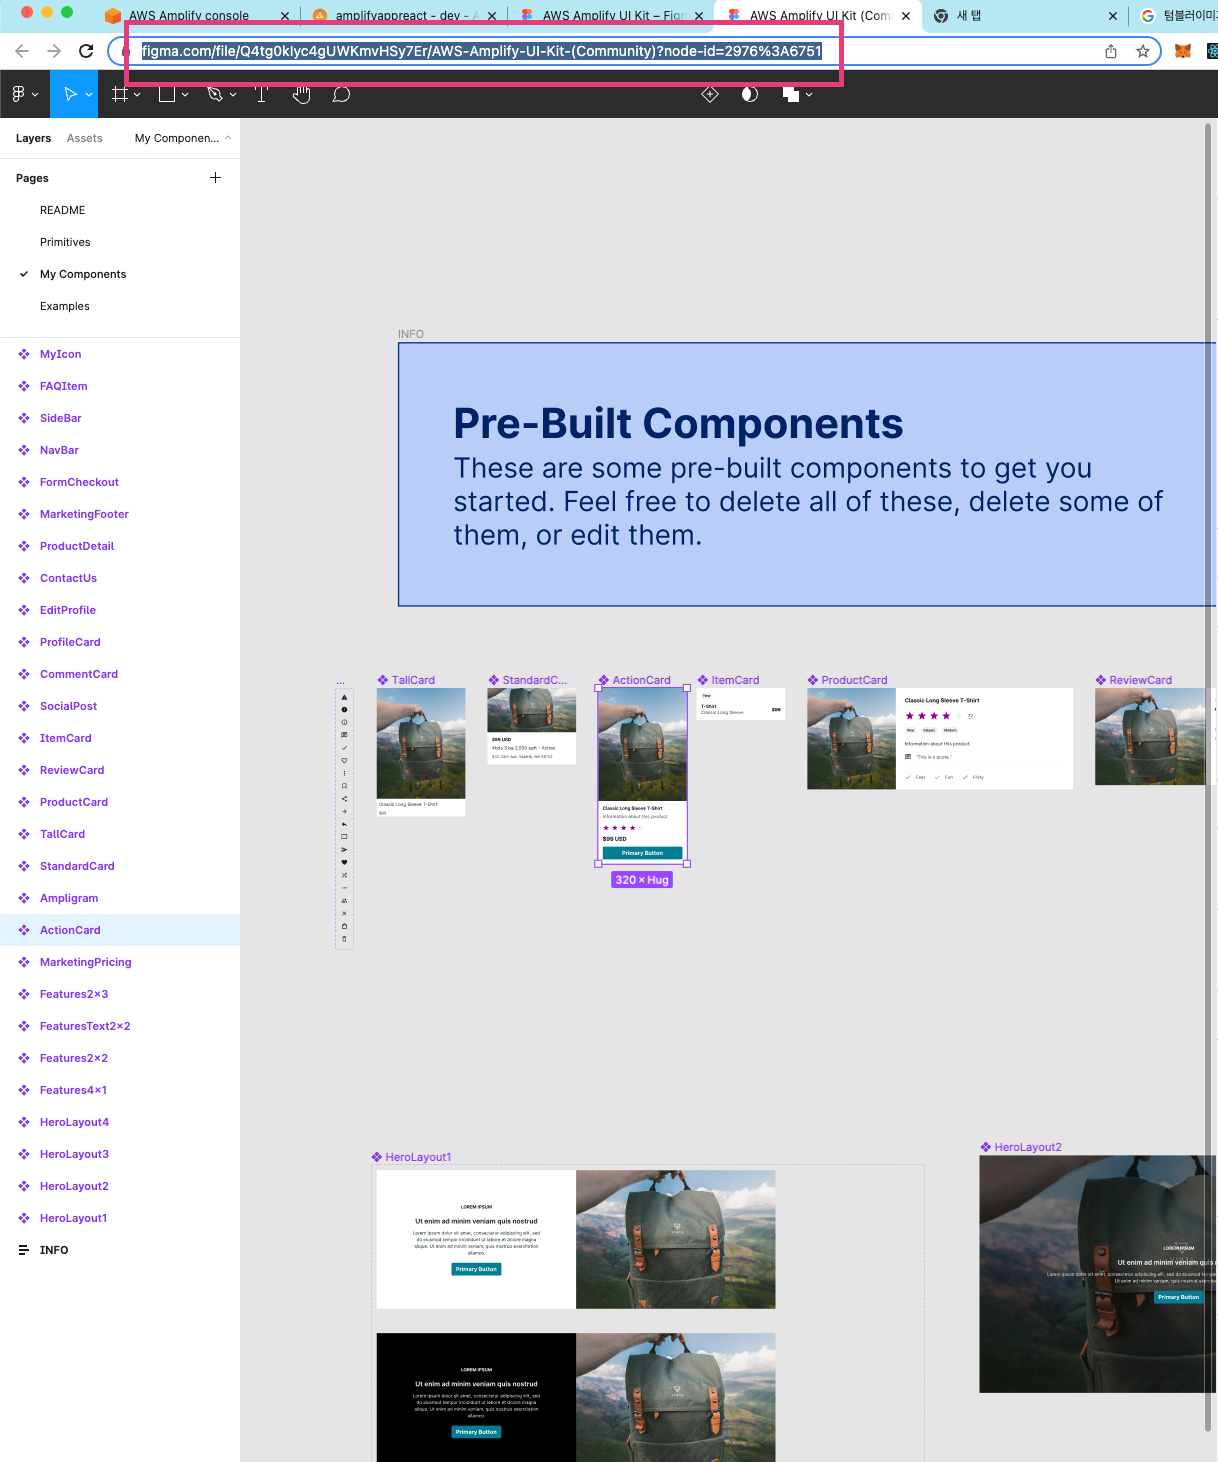
피그마 화면에서 my component페이지 선택 후 해당 페이지 url 복사

get started > 위에 복사한 주소 복사
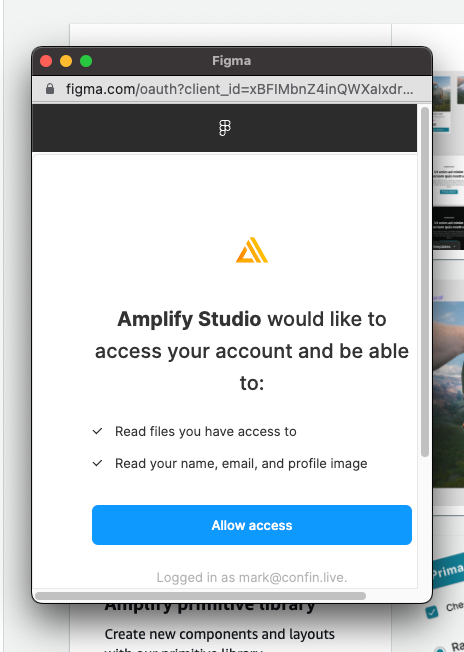
접근권한 허용

Accept버튼을 눌러 컴포넌트 당 임포트를 진행하거나, 상단의 Accept all을 눌러 모든 컴포넌트를 한 번에 임포트를 할 수 있습니다.

UI 컴포넌트와 데이터 연결하기
디자인 임포트가 모두 완료되었다면 UI LIbrary에 새롭게 추가된 컴포넌트들을 확인할 수 있음.
이제 해당 컴포넌트들과 데이터를 연결하면 됨.
데이터 연결을 원하는 컴포넌트를 선택 후에 화면 상단의 ‘Configure’ 버튼을 클릭

그리고 화면 왼편의 Elements tree에서 원하는 요소를 클릭하여 원하는 데이터 모델과 연결할 수 있고,
화면 오른편에서 Component property를 추가해줘야 함

여기서는 image라는 이름의 Component property를 만들고,
타입은 앞서 생성한 Item 데이터 모델을 선택.
child property에는 각각 엘레먼트에 해당하는 프로퍼티를 설정.

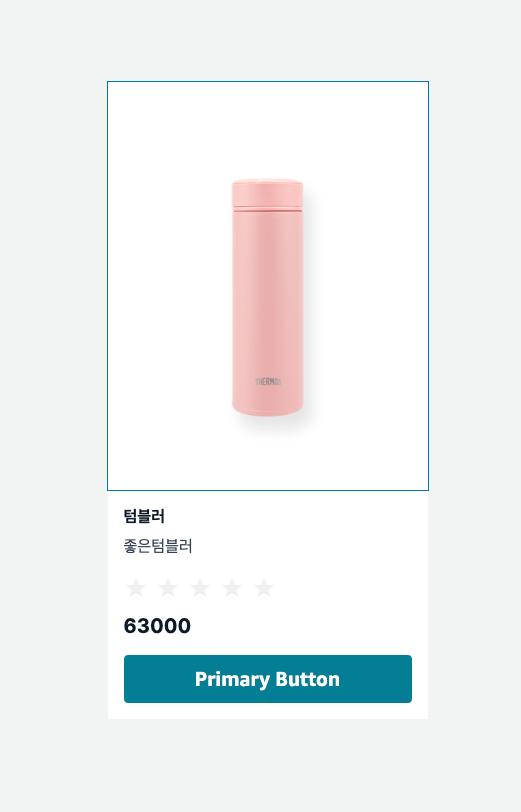
앞서 만든 데이터를 연결할 경우 테이블의 더미데이터와 연결되어 출력됨

화면 상단의 ‘Create Collection’ 버튼을 누름.

레이아웃으로 스타일 적용할수 있음.
리액트 앱에 코드로 해당 UI들을 사용할 준비가 완료.
Amplify UI Component 리액트앱에서 사용하기
React App에 Amplify 사용코드를 추가하기 (index.js 수정)
import Amplify from 'aws-amplify';
import "@aws-amplify/ui-react/styles.css";
import {AmplifyProvider} from "@aws-amplify/ui-react";
import awsconfig from './aws-exports';Amplify.configure(awsconfig);<App /> 를 <AmplifyProvider></AmplifyProvider> 로 감싸기
ReactDOM.render(
   <React.StrictMode>
       <AmplifyProvider>
           <App />
       </AmplifyProvider>
   </React.StrictMode>,
   document.getElementById('root')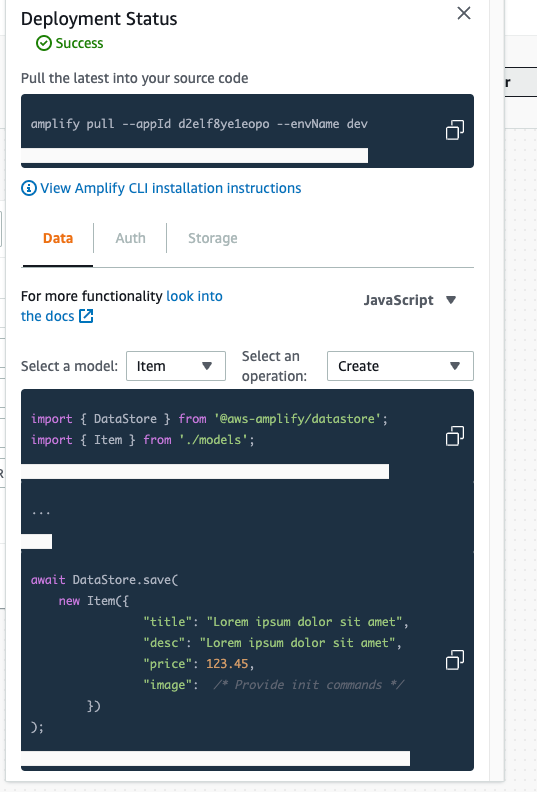
);Amplify CLI를 통해 Backend (Amplify admin)에서 만든컴포넌트들 pull 받기
amplify pull — appId <YOUR-AMPLIFY-APP-ID> — envName dev
//$ amplify pull --appId abeasd8ye1eopo --envName dev생성된 코드 React 에서 사용하기
스튜디오에서 생성한 TallCardCollection컴포넌트를 임포트하여 사용
import './App.css';
import { TallCardCollection } from './ui-components';

function App() {
  return (
    <div className="App">
      <TallCardCollection />
    </div>
  );
}
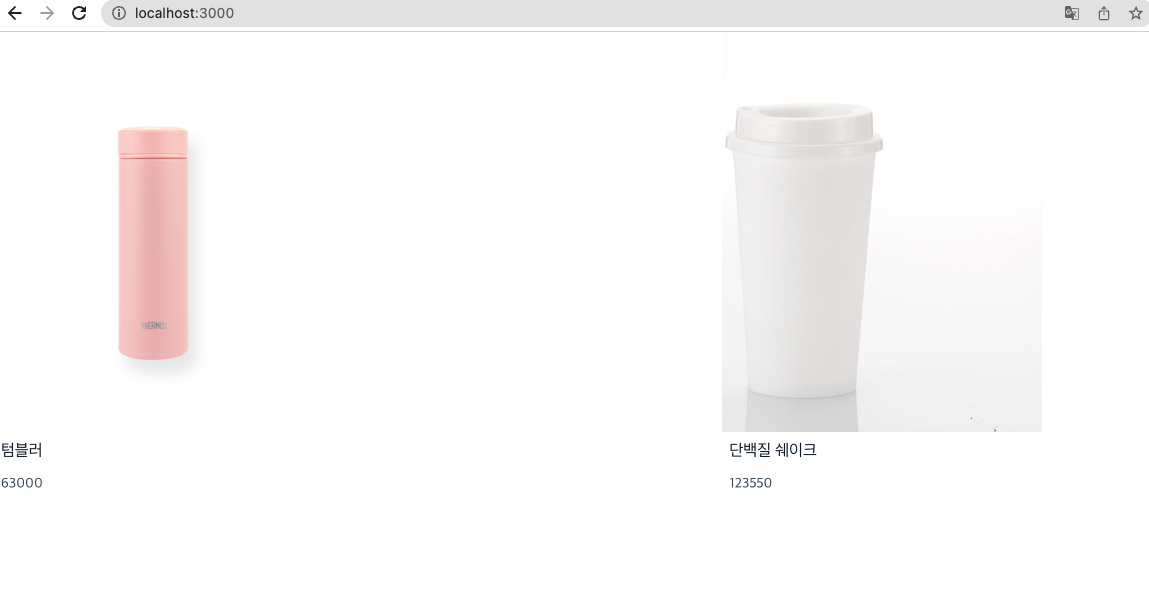
export default App;로컬에서도 잘됨
비용
Amplify 자체 비용은 없으며, Amplify가 앱관리를 위해
사용하는 다른 AWS 리소스의 (예: S3, Lambda, DynamoDB, API Gateway 등) 비용만 내면 됨
앱 사용과 관련한 비용을 미리 계산해보고 싶다면 *AWS Pricing Calculator*를 사용
복잡한 백엔드 설계없이 빌더형태로 가져다 쓸수 있도록 잘 만들어진 서비스라 생각됨.
활용도와 숙련도가 올라갈수록 정말 빠르게 구축할수 있을것같다. 좀더 다뤄봐야할것같다.
'AWS' 카테고리의 다른 글
| Next.js 정적 웹사이트 S3 + CloudFront + Route53 (가비아 도메인적용) (0) | 2023.09.08 |
|---|---|
| Next13 App router SSR(server side rendering) Amplify 배포 이슈(feat.슬랙에 배포알림 연동하기) (0) | 2023.08.24 |
| SSL/TLS 인증서 자동갱신이 되지 않을때 - AWS ACM, Route53 (0) | 2023.08.17 |
| [AWS]DynamoDB Scan vs Query 성능 및 비용테스트 및 DB설계의 중요성 (0) | 2023.02.03 |